|
21 Feb 2015 by K Bonneau
Beginning Unity 3D Scripting for Developers [Part 1]
c#
PrerequisitesBasic Programming Knowledge Unity 3D. Download it from here Creating a New ProjectWhen you start unity the first time you should see the Project Wizard dialog with two tabs, "Open Project" & "Create New Project". (If you don't see the Project Wizard dialog, go to File Menu -> New Project. In the "Create New Project" tab, type your desired folder name and click create. This is where the unity project will be saved.
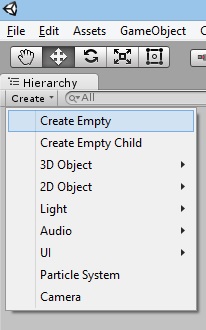
What you see now is a scene. Every object in your game has to be derived from the GameObject class. A GameObject itself doesn’t do anything, but is just a container for multiple Components (of type Component). Any number of components can be added to a GameObject. For example every game object comes with a Component called Transform, which defines the object's Position, Rotation and Scale. One of the components that we will add today is called Script, which is just a class of type MonoBehavior (which as you might have guessed eventually has Component as its parent). As we don't have a Main() method exposed, there is no real entry point we can code. Instead what we will do is create a new GameObject called "Main", and attach a script to it which will act as our "pseudo" entry point method. Once we add this game object to the scene, the code in the script will get executed. Creating a new Empty GameObjectKeyboard Shortcut: Ctrl + Shift + N
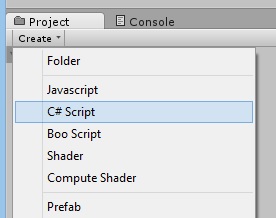
Rename the object to Main (Select the newly created GameObject, right click -> Rename, or Press F2 and then type "Main") Creating a new ScriptIn the bottom pane, Project tab, click on Create and select C# Script. Type Main and press Enter.
Double click on the script (the file should be listed in the Assets window) and Mono Develop Editor should open up. Following is the default code created for you: using UnityEngine;
using System.Collections;
public class Main : MonoBehaviour {
// Use this for initialization
void Start () {
}
// Update is called once per frame
void Update () {
}
}
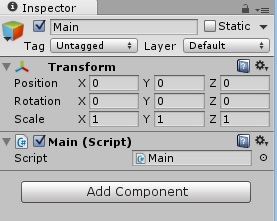
The Start() and Update() MethodsThe Start() method is used for initialization and is called exactly once throughout the lifetime of the instance. The Update() method is called each frame. If your frame rate is 60 frames per seconds (fps), the Update method will get called 60 time in one second.Attaching the Script to GameObjectOur script will not run by itself. It has to be attached to a GameObject. Go back to Unity UI, drag the "Main" script file and drop it on to the Main game object. 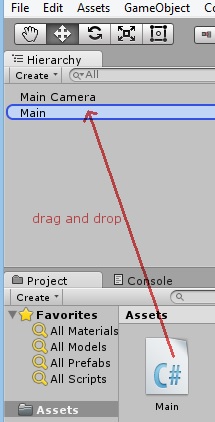 Once you do this, when you select the Main game object, you should be able to see the Main (Script) component added to the GameObject, in the Inspector window on the right.
Writing some codeGo back to Mono Develop, and add the statement print("Hello World"); to the Start() function.void Start () {
print ("Hello World");
}
Build the Script. (Press F8 OR Build->Build All)Go back to Unity UI, and click Play. Shortcut Ctrl+P
You should now be able to See "Hello World" printed in the Console Window. (Bottom Pane, select Console tab if not already active.
Exciting, isn't it? No? Well, let's add a Sphere. Adding a Primitive ObjectThe GameObject class has a static function CreatePrimitive() which allows us to create some Primitive objects like Sphere, Capsule, Cylinder, Cube, Plane & Quad.The game object's renderer property defines how the object will be rendered (how it looks) on screen. As we haven't gone into details of materials, for now you can assume that we can change the color of the sphere by setting GameObject.renderer.material.color = Color.xxx Applying the above to code in MonoDevelop, the file should now look like: using UnityEngine;
using System.Collections;
public class Main : MonoBehaviour {
GameObject sphere;
// Use this for initialization
void Start () {
sphere = GameObject.CreatePrimitive (PrimitiveType.Sphere);
sphere.renderer.material.color = Color.red;
}
// Update is called once per frame
void Update () {
}
}
Build (F8). Go to unity and click Play.
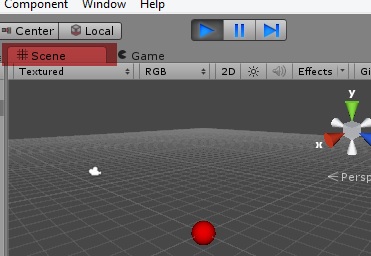
You should see:
It looks more like circle as we haven’t yet added proper lighting. But you can click on the "scene" tab (which is kind of a debugger) and see it in a different "light".
Save your scene (File->Save Scene) Next: Part 2 Comments |